React Native Workshop
Lecture 1:
Understanding the Mobile Landscape
So you want to build a mobile app...

Traditional Mobile App Development
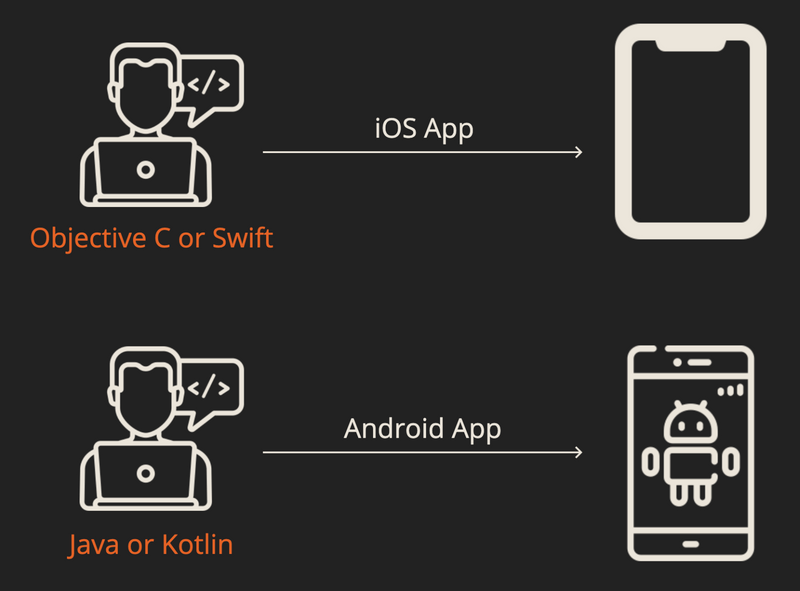
Mobile Landscape

Learn once build anywhere
The benefit of React Native is that if you understand how to build a React Native app for iOS, you understand how to build a React Native app for Android.

Understanding all different types of apps
Let's go through this article
React Native Code

AnnieCannons Mobile Technologies
Learn more here
AnnieCannons Mobile Technologies
- Progressive Web Application: Aya Contigo
- Native Mobile Application: CHANI
- React Native Application: EasyTRO
How are React.js and React Native similar?
- JavaScript!
- Components!
- State!
- Chrome Dev Tools!
- File Structure!
- API calls!
- IDE (Visual Studio Code)!
How are React.js and React Native different?
- JSX vs Built-In Components!
- Styling!
- Navigation!
- Deployment/Dev Testing!
- Native Modules!
Setting up a Project
Using Expo
When installing globally, you will likely need to use 'sudo'
You can select the blank template.
Install Expo Client from the App Store
Scanning the QR code to see the Hello World App (same wifi network)
Folder Structure
- node_modules and package.json and package.lock
- /.expo-shared - this is an expo internal folder
- /assets - this is where we store any assets we may want to use in our application, like images, videos, fonts and icons
- .gitignore - this is a file to tell .git which files and directories we want to omit from course control. node_modules is listed there
- app.json - another config file, mostly for expo metadata
- babel.config.js - babel config, used to add the expo preset
- App.js
- Create the src folder
Debugging
You can still use console.log()
Shake your device to see the debug and reload tools.

Lecture 2:
React Native Fundamentals
Components
React Native, like React,js, is component-based.
You can use both functional components and class components in React Native, just like React.js
However, React Native does not create HTML with the help of JSX. Instead, we will need to use React Native Components.
Developing Class Components
In React
import React, { Component } from 'react';
class HelloWorldApp extends React {
  render(){
    return (
      <h1>Hello World</h1>
    )
  }
}
becomes....
import React, { Component } from 'react';
import {Text} from 'react-native';
class HelloWorldApp extends Component{
  render(){
    return (
      <Text>Hello World</Text>
    )
  }
}
Developing Functional Components
In React
import React, { Component } from 'react';

export default function App() {
    return (
      <h1>Hello World</h1>
    )
}
becomes....
import React, { Component } from 'react';
import { Text } from 'react-native';

export default function App(){
    return (
      <Text>Hello World</Text>
    )
}
React Native Components
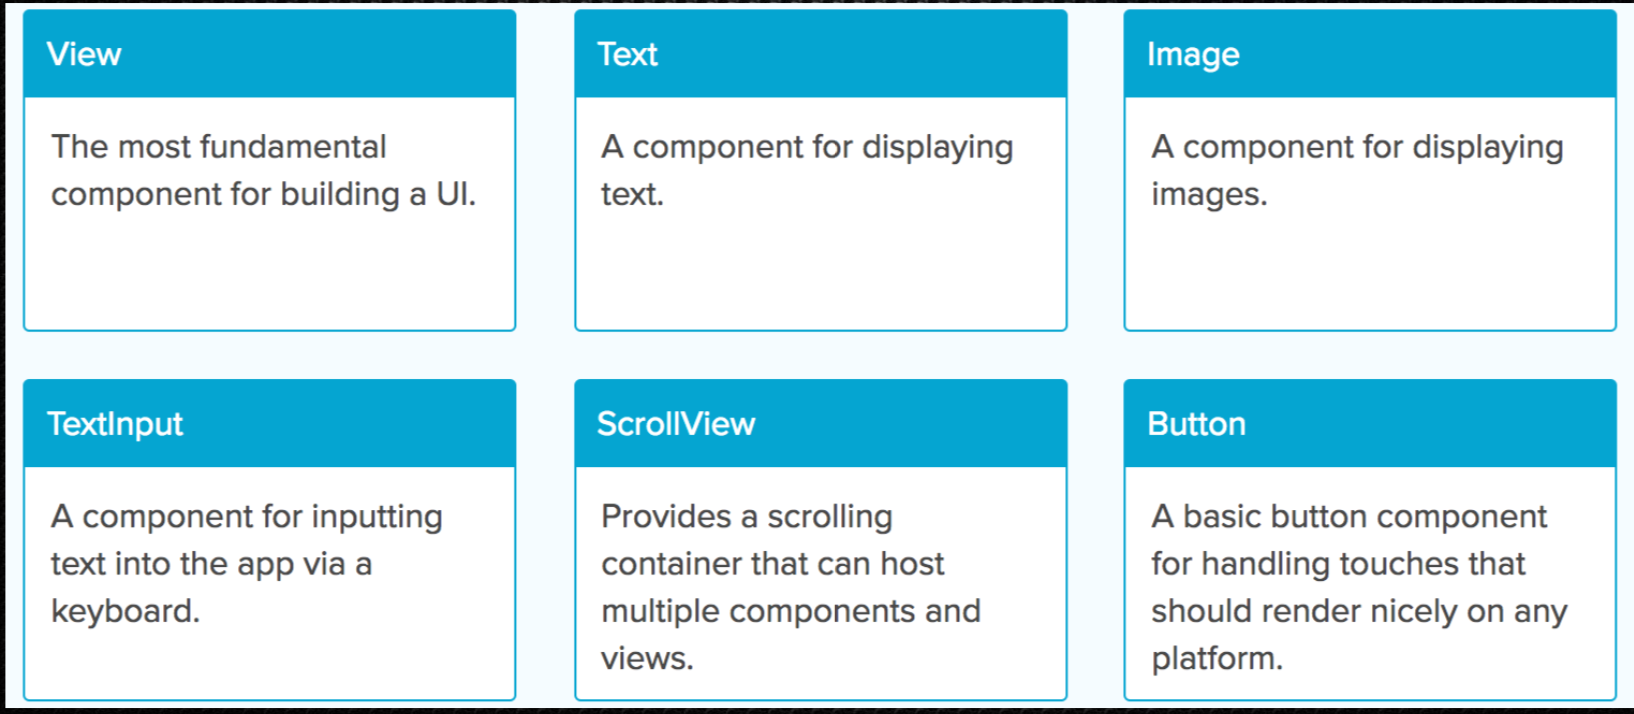
Examples
- ListView like a ul
- View like a div
- Scrollview is a div with overflow:scroll
- Text is like a paragraph
Other Element Changes
Docs here
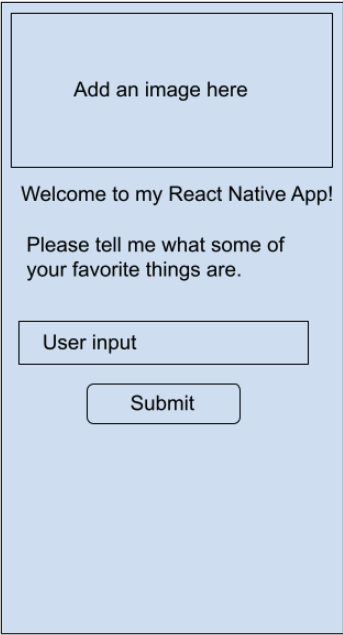
Assignment: Basic Component
Create the following:
Styling in React Native
CSS - Yes
Cascading? - No
We use a StyleSheet from react-native to create the styles. The styling you add will only apply to that component.

Stylesheet
All components have a style prop that accepts a JavaScript object.
You can use Stylesheet.create() to create a variable that is used to style your components.
Example
import React, { Component } from 'react';
import { StyleSheet, Text, View } from 'react-native';

const styles = StyleSheet.create({
 red: {
  padding: 10,
 },
 medium: {
  fontSize: '12px'
 }
});

class LotsOfStyles extends Component {
  render() {
    return (
      <View>
       <Text style={styles.red}>just red</Text>
       <Text style={[styles.medium, styles.red]}>medium and red</Text>
      </View>
    );
  }
}
Example
Styles have to be written in JS syntax
const styles = StyleSheet.create({
  blue: {
    color: 'blue',
    fontWeight: 'bold',
    fontSize: 30,
  },
  red: {
    color: 'red',
  }
});
Assignment
Add styling to each one of the elements in your App component.
Layout - Flexbox
- Mobile viewports have fixed dimensions
- In React Native, all positioning is done using FlexBox and all elements have display: flex applied by default.
- React Native allows you to use flexbox to layout components, just like on the web.
- BUT it is required and the defaults are different, ie flexDirection is defaulted to column and alignItems is defaulted to stretch instead of flex-start.
- More here
Flexbox
This will center the items in the middle of the screen.
const styles = StyleSheet.create({
 container: {
  flex: 1,
  justifyContent: 'center',
 },
});
Understanding flex here
Props
Very much the same as React.js
//Colorbox.js
import React from 'react';
import { View, Text, StyleSheet } from 'react-native';

const ColorBox = props => {
 return (
  <View>
   <Text>
    {props.colorName} {props.hexCode}
   </Text>
  </View>
 );
};
//Home.js
<ColorBox hexCode="#2aa198" colorName="Cyan" />
Lists
Want to use a map to create a list of components or strings? Sadly, no.
While we use .map() on the web, in React Native you should avoid using map in the render. This is because mapping over an array is not optimized. React Native will attempt to render every single element in the array all at once, regardless of whether they are visible on the screen or not.
Props for Lists
- data - this is the array of data you want to map over
- renderItem - this is a function that is passed the item and its index and will return the individual item component
- keyExtractor - this is a function that gets passed an item and its index
List Example
Parent Component
//Home.js
import React from 'react';
import { View, Text, StyleSheet, FlatList } from 'react-native';
import ColorBox from './components/ColorBox';

const COLORS = [
  { colorName: 'red' },
  { colorName: 'green' },
  { colorName: 'blue' },
  { colorName: 'yellow'},
  { colorName: 'purple' },
];
const App = () => {
return (
 <View>
  <FlatList
   data={COLORS}
   keyExtractor={item => item.colorName}
   renderItem={({ item }) => ( <ColorBox colorName={item.colorName} />)}
  />
 </View>
);
const styles = StyleSheet.create({
 fontWeight: 'bold',
 marginBottom: 10,
});

export default App;
List Example
Child Component
import React from 'react';
import { View, Text, StyleSheet } from 'react-native';

const ColorBox = props => {
 return (
  <View>
   <Text>{props.colorName}</Text>
  </View>
 );
}

export default ColorBox;
More docs here
List Exercise
Create the following FlatList. You can use whichever colors you would like.

Creating a React Native App
- Make sure you have Node installed
- Make sure you have Watchman as well:
brew install watchman - Xcode: The easiest way to install Xcode is via the Mac App Store.
- Command Line Tools: Open Xcode, then choose "Preferences..." from the Xcode menu. Go to the Locations panel and install the tools by selecting the most recent version in the Command Line Tools dropdown.
- Install CocoaPods:
sudo gem install cocoapods
Review
React Navigation
Routing and Navigation here
Lecture 2: XCode and the Simulator
Check out the Docs
The IDE

Project Settings
XCode Tutorial
Let's go through this.
Xcode 12
Understand the Xcode basics here
Xcode 12 updates here
Lecture 3: Connecting to a Database
Firebase
THE END
Thank you for your attention!